Recently I came up with an idea for a mobile application. To be honest, it’s more of an excuse to try my hand at writing Android applications and do something new. Since I had almost zero experience with Android I have started by reading the official Google guides and then doing some napkin grade designs of the application architecture.
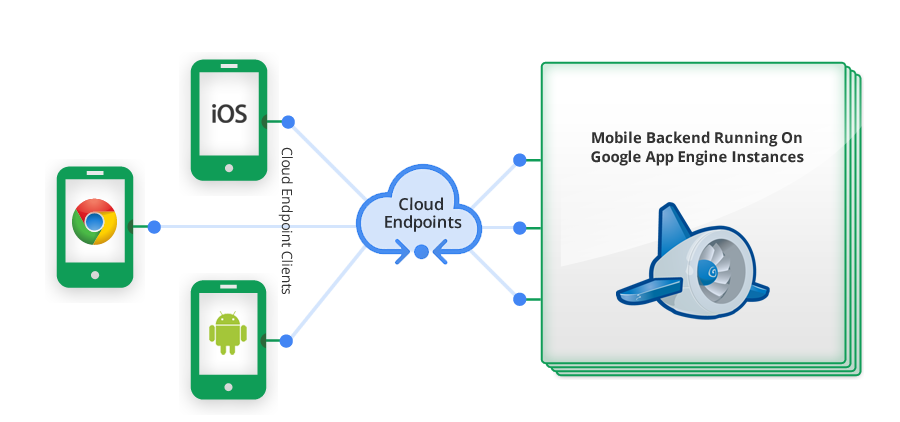
Immediately I have realized that app requires a back-end as some of the things cannot be reliably performed on the handset itself. Lurking around I have learned about Google Cloud Endpoints lets you create a REST API that clients (be that iOS, Android or JavaScript) can access. Furthermore, my application needs to know who is talking to the back-end so authentication is a hard requirement.
I don’t know about you but personally my productivity is high only when I have a reliable development environment that provides immediate feedback. My first goal then was to create a local environment where I could prototype with Google APIs piece by piece and proceed with building the actual app.
It turned that there are many official pages and guides talking about Google Endpoints and the integration with Android. There is even a 1-click solution called the Mobile Backend Starter. My problem with such solutions is that I don’t get a feel for what is being done for me so I prefer to start with the smallest amount of code possible and incrementally build on top of it.
In this article I will guide you through creating a trivial Android application that talks to a back-end powered by Google Cloud Endpoints. Ultimately, the back-end would run on AppEngine but my immediate goal is to provide you with a reliable local development environment where you could try things out. To sum up here are our goals:
create a dev environment for writing and exploring Android apps that talk to Google Cloud Endpoints (GCE) back-end
use OAuth to authenticate the app to the back-end
create a simple Android app that demonstrates Android app talking to the GCE back-end and using OAuth to authenticate against the back-end
I assume you are comfortable with Java but have not done much Android programming and are not familiar with any of the Google cloud products. I assume you are a quick learner and will look things up when something isn’t clear. I also assume you’re running Linux. I believe instructions are the same for OSX but have no idea about Windows.
Our Android app will have a button and a text field. When the button is pressed the app will authenticate against the back-end, make a call on a back-end endpoint and put the result in the text field. The endpoint will return the e-mail of the authenticated user. Let’s get started.
Install Android SDK and Google tools
First, we’ll install the Android SDK (called ADT) which is basically an Eclipse IDE bundled with Android-specific tools. Since ADT is Eclipse I use it for both, developing the Android app and the back-end. Head over to http://developer.android.com/sdk/index.html to download the bundle.
Once you download the bundle unpack it and execute eclipse/eclipse from within the ADT directory. ADT will start up:
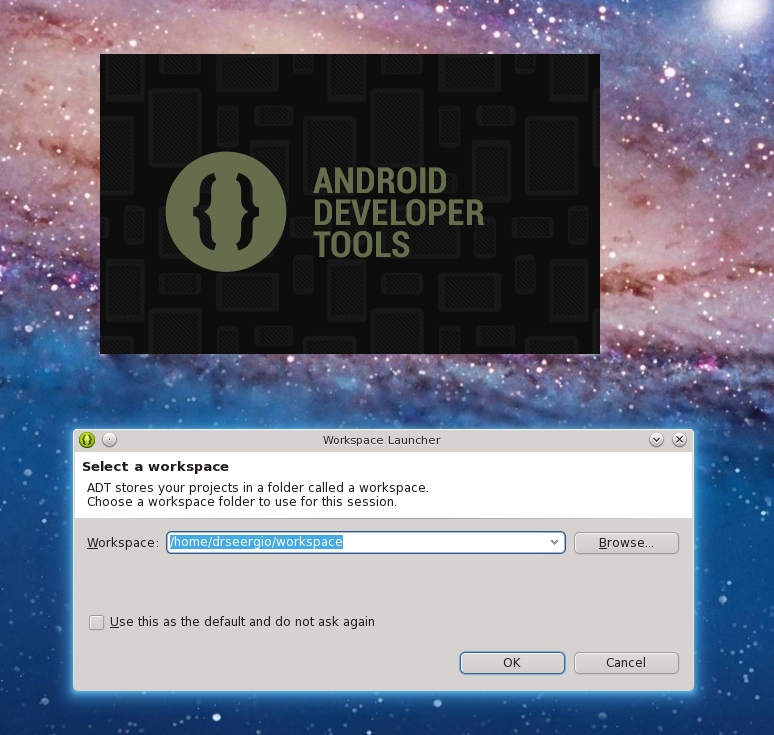
Choose a folder where you will keep all your projects.
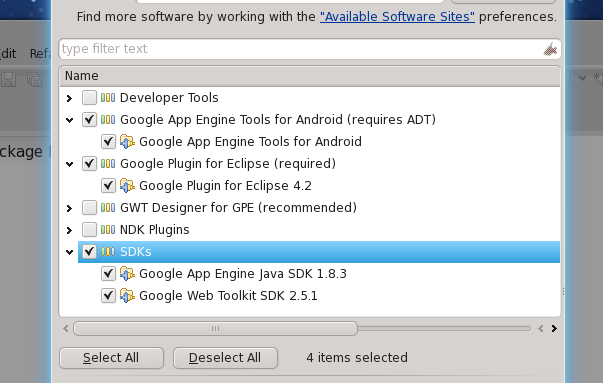
Once ADT starts close the default tab and head over to menubar item Help > Install New Software. We’ll need to add Google Eclipse Plugin to have AppEngine integration in ADT. You’ll need the URL of the plugin repository. You can find the URL at https://developers.google.com/eclipse/docs/getting_started. Currently, ADT is Eclipse version 3.8⁄4.2 so I’m using URL http://dl.google.com/eclipse/plugin/4.2. Put that URL into field Work with and press Add, then choose an arbitrary name (say, Google) and click OK. Make sure you select the components shown in the screen-shot below:
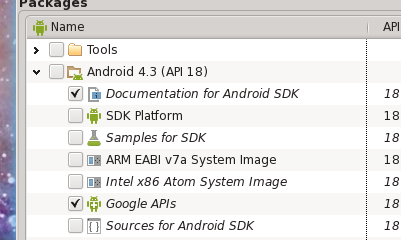
Click Next, accept the license agreements and press Finish to begin installation. Once the additional software is installed and ADT has restarted we’ll need one more piece. Open Window > Android SDK Manager. You’ll need to select Google APIs for the latest Android version. In my case, the latest is 4.3:
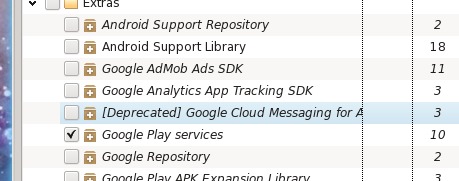
We’ll also need Google Play Services library for authenticating our app to the back-end:
At this point we have installed all software that we’ll need for developing and testing our code.
Create Google Cloud project
Since our ultimate intention is to run back-end on Google servers using AppEngine we’ll go through steps to provision a new “Google cloud project” in the “Google cloud console”. This is required even if you intend to perform local testing only. Specifically, we’ll be creating so-called client IDs which are needed to allow our Android app to talk to the back-end.
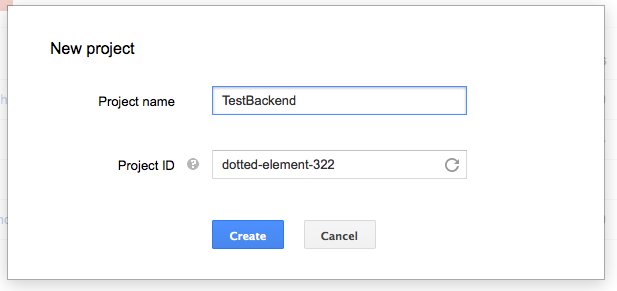
Head over to https://cloud.google.com/console and create a new project. Choose any name you want:
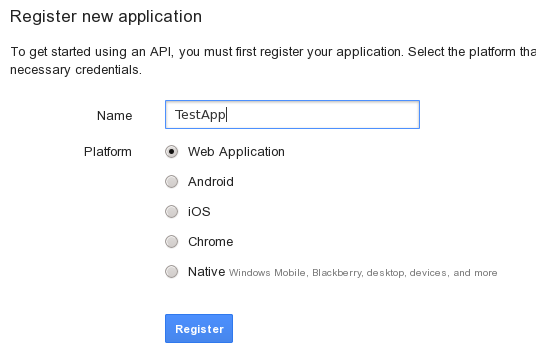
Once the project is created click on APIs & auth > Registered apps and press on REGISTER APP. Next, select Web Application and use any name you want:
At this point you should note down the resulting OAuth2 client ID, we’ll make use of it in our code:

In my case, the web client ID is 607077117986.apps.googleusercontent.com.
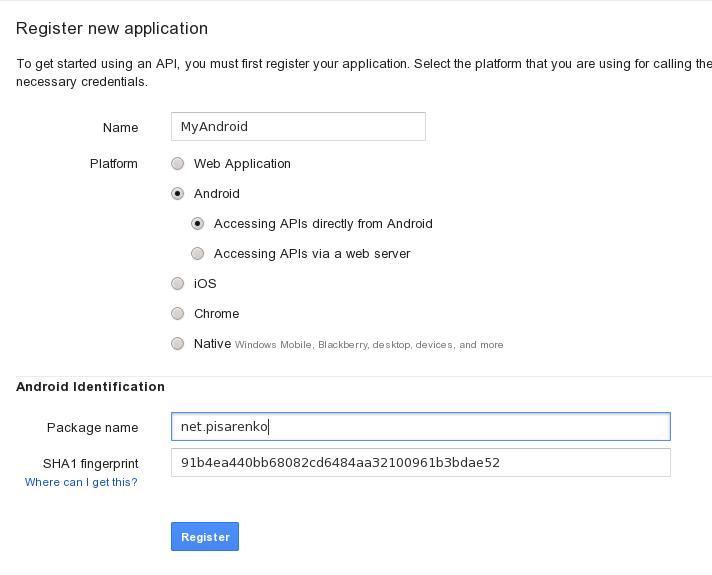
We’ll need to perform similar steps for obtaining Android client ID. For this you will need SHA1 checksum of the key used to sign Android app package. During the development phase normally the debug key is used. By default it’s stored in ~/.android/debug.keystore. To obtain the checksum type the following in the terminal:
$ keytool -exportcert -alias androiddebugkey -keystore ~/.android/debug.keystore | openssl sha1
Type android when asked for a password and note down the value returned to you. Go back to the cloud console and press REGISTER APP. This time choose Android, specify any name you want. In addition, you will need to input the checksum we obtained earlier and specify our Android app package name. We have not yet created our app but let’s decide on package name now. I’ve chosen net.pisarenko. Unless you’re feeling creative right now leave it as it is:
We’ll need to note down the Android client ID similarly to what we have done with the web client ID:
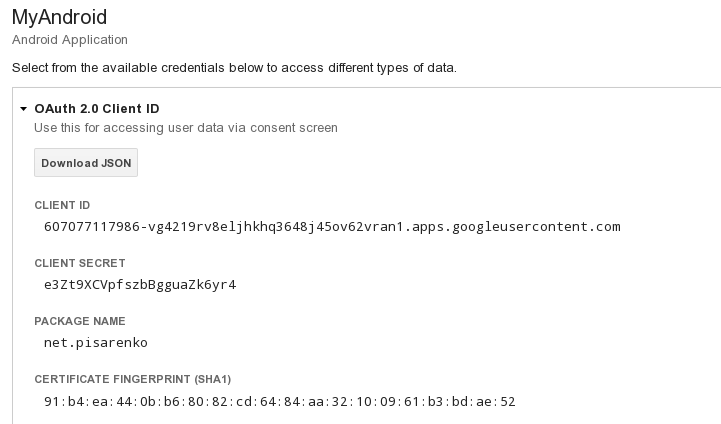
In this case it’s 607077117986-vg4219rv8eljhkhq3648j45ov62vran1.apps.googleusercontent.com.
Great job, we’re done with configuring the cloud! Let’s finally create our app!
Create AppEngine-powered Android app
As a first step we’ll create 2 projects using a pre-defined IDE template. One project is for the Android app. The other one is for the back-end. To create the projects open File > New > Other > Google > App Engine > Connected Android Project. Then choose a name (I chose MyTestApp) and specify net.pisarenko as the package name. You are free to choose a different package name but it must be the same as the one you chose in cloud console. Click Finish.
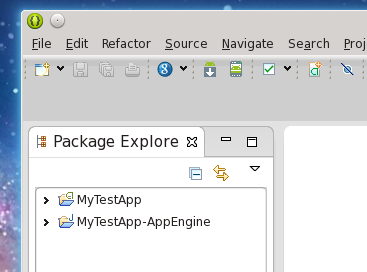
At this point you’ll have 2 projects. MyTestApp is the Android app. MyTestApp-AppEngine is the back-end:
Write/alter the back-end code
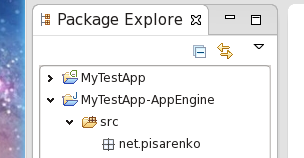
At this point we have some generated code but as I mentioned in the introduction I don’t like that. I prefer to start really minimal so that I understand what’s happening. Let’s start by deleting all files under MyTestApp-AppEngine > src > net.pisarenko so it looks like this:
By doing this we have deleted the default endpoints provided by the template. Now we’ll write our own endpoint. First, it’s important to realize that Cloud endpoints operate on POJO objects (basically Java objects with getters and setters) so you can’t just send a string or expect a string in return from the back-end. We’ll start by defining some simple objects. Let’s create one class to represent a request argument and another class for the return value. Create a class MyRequest with the following code:
package net.pisarenko;

import javax.persistence.Entity;

@Entity
public class MyRequest {
    private String message;

    public String getMessage() {
        return message;
    }

    public void setMessage(String message) {
        this.message = message;
    }
}
Note the use of @Entity annotation. And a similar class for the result value:
package net.pisarenko;

import javax.persistence.Entity;

@Entity
public class MyResult {
    private String value;

    public MyResult(String value) {
        this.value = value;
    }

    public String getValue() {
        return value;
    }

    public void setValue(String value) {
        this.value = value;
    }
}
Now let’s create a simple endpoint. I’ve called it MyEndpoint. Take note of annotations, I believe most of them are self-explanatory:
package net.pisarenko;

import com.google.api.server.spi.config.Api;
import com.google.api.server.spi.config.ApiMethod;
import com.google.api.server.spi.config.ApiNamespace;

import java.util.logging.Logger;

@Api(name = "myendpoint", namespace = @ApiNamespace(
    ownerDomain = "pisarenko.net",
    ownerName = "pisarenko.net", packagePath = ""))
public class MyEndpoint {
    private static final Logger log = Logger.getLogger(
        MyEndpoint.class.getName());

    @ApiMethod(name = "compute")
    public MyResult compute(MyRequest req) {
        log.severe("API CALLED");
        return new MyResult("HELLO " + req.getMessage());
    }
}
As you see, the API will be exposed under name myendpoint and the endpoint is going to be called compute. The endpoint logs the call, takes the input value and returns a string wrapped into a MyResult POJO.
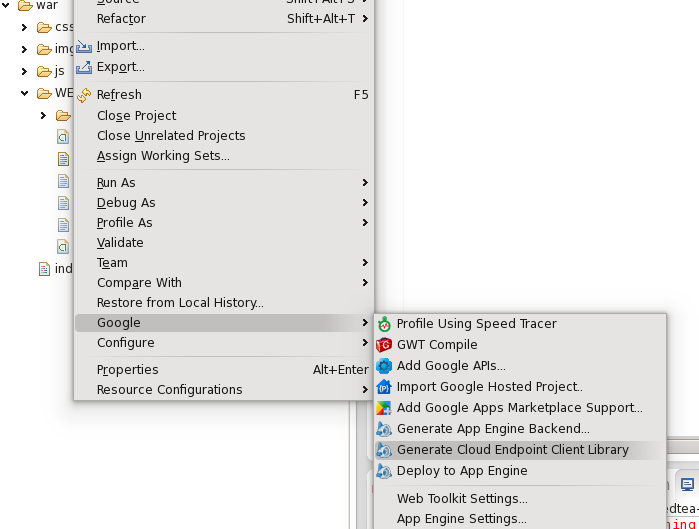
After you make changes to the back-end you must regenerate client libraries before you run the back-end or try to use new/changed functionality in the client. To regenerate simply right click the back-end project and choose Google > Generate Cloud Endpoint Library:
API explorer
Wow, we have a back-end. Now, wouldn’t it be cool if we could try it out without the hassle of deploying it? Well, that’s possible using Google API Explorer. The coolest part is that API explorer works with locally run back-ends!
First, we’ll need to start our back-end locally. Click Run > Run. Unless port 8888 is used on your machine the back-end will start and you’ll see output in Eclipse console:
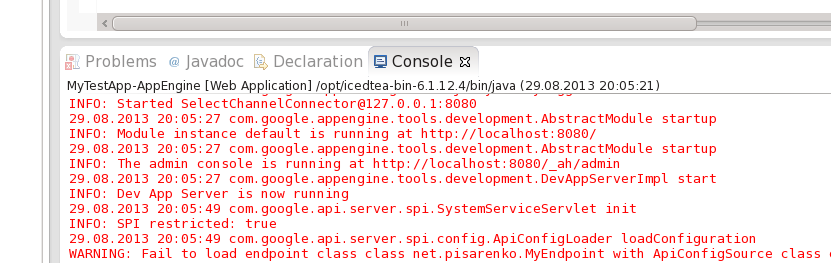
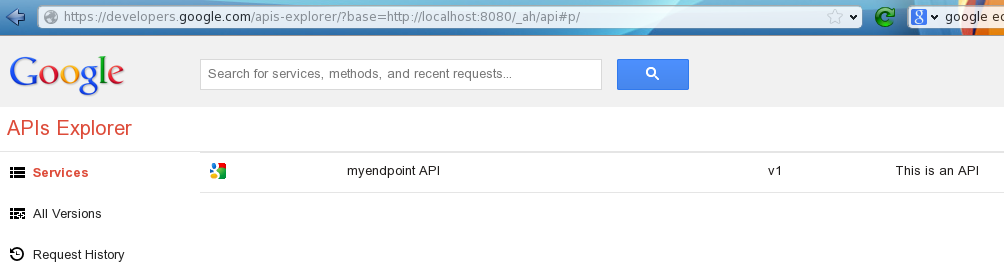
Note that I’m running my back-end on port 8080 as port 8888 is occupied on my machine for something else. Now, the magic part. Point your browser to https://developers.google.com/apis-explorer/?base=http://localhost:8888/_ah/api#p/ and you’ll see your endpoint magically appearing:
You can make interactive calls to your local back-end right in the explorer and observe the output (again, note that I’m using port 8080 and not 8888):
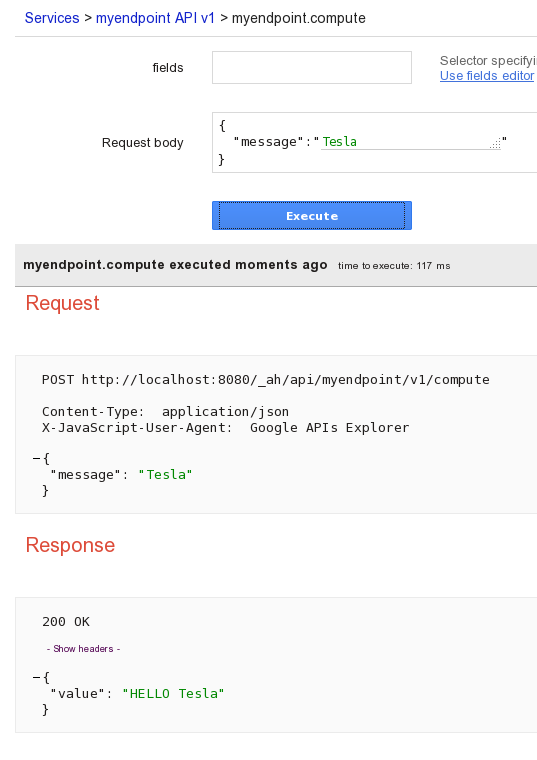
Observe that when you’re doing these calls the console output in ADT logs a line API CALLED which confirms that we’re executing it! Without API explorer it would be harder to test and develop endpoints. You would need to craft complicated HTTP requests or write a test client.
Add authentication
At this point we have a working back-end with an endpoint. Before we move on to our Android app let’s implement authentication. After all, the Android app I’m working on must be able to identify itself to the back-end in order to retrieve user’s items.
We’ll need to include client IDs that we had generated previously and update our endpoint. Let’s create constants for the client IDs. I’ll create a separate class called Ids:
package net.pisarenko;

public class Ids {
    public static final String WEB_CLIENT_ID =
            "607077117986.apps.googleusercontent.com";
    public static final String ANDROID_CLIENT_ID =
            "607077117986-vg4219rv8eljhkhq3648j45ov62vran1.apps.googleusercontent.com";
    public static final String ANDROID_AUDIENCE = WEB_CLIENT_ID;
}
Remember, these are the same IDs that we previously got from the cloud console. Next, we need to update the endpoint code to use authentication:
package net.pisarenko;

import com.google.api.server.spi.config.Api;
import com.google.api.server.spi.config.ApiMethod;
import com.google.api.server.spi.config.ApiNamespace;
import com.google.appengine.api.users.User;

import static com.google.api.server.spi.Constant.API_EXPLORER_CLIENT_ID;

import java.util.logging.Logger;

@Api(name = "myendpoint", namespace = @ApiNamespace(ownerDomain = "pisarenko.net", ownerName = "pisarenko.net", packagePath = ""))
public class MyEndpoint {
    private static final Logger log = Logger.getLogger(MyEndpoint.class.getName());

    @ApiMethod(name = "compute",
            clientIds = {
                Ids.WEB_CLIENT_ID,
                Ids.ANDROID_CLIENT_ID,
                API_EXPLORER_CLIENT_ID },
            audiences = { Ids.WEB_CLIENT_ID, Ids.ANDROID_CLIENT_ID },
            scopes = {
                "https://www.googleapis.com/auth/userinfo.email",
                "https://www.googleapis.com/auth/userinfo.profile" })
    public MyResult compute(MyRequest req, User user) {
        log.severe("CALLING");
        if (user == null) {
            return new MyResult("HELLO " + req.getMessage());
        } else {
            return new MyResult("HELLO " + user.getEmail());
        }
    }
}
Observe what we have introduced:
added
clientIds,audiencesandscopesto the@ApiMethodannotation.API_EXPLORER_CLIENT_IDclient ID is needed if we want to allow API explorer to work with our endpoint. Since we’re in development/debug mode we surely want that. I don’t yet fully understand what theaudiencesis used for.scopesdefines what information we will get from the user.added
Userparameter to the method. If necessary you can throw an exception if someone tries to use the endpoint without a valid identity.
Our endpoint will now return a string with user’s e-mail address if she is authenticated. Let’s try this out! Regenerate the endpoint library, stop the back-end if it’s running and start it. Then open the API explorer.
Refresh the page to make sure that API explorer has an updated view of your endpoint. First, try using the endpoint same way as you did before and confirm that the behavior is the same.
Then, click the Authorize requests using OAuth 2.0 button on the right of the API explorer. You’ll be present with the following dialog:
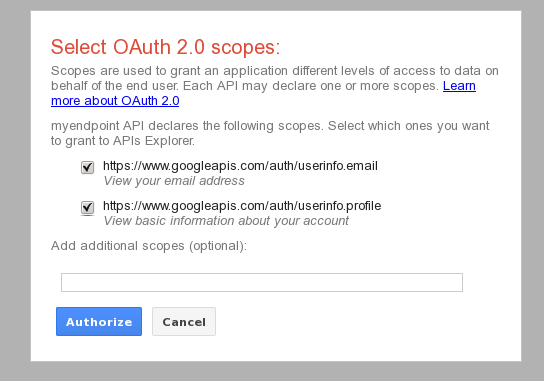
Select both scopes and click Authorize. This basically means that you grant your own back-end to access certain information from your Google account. Another dialog might appear asking whether you grant access or not. Allow it.
Do another call again. Notice that the return value is different this time. Your e-mail is now returned! Well, in the case of API explorer the value will always be example@example.com:
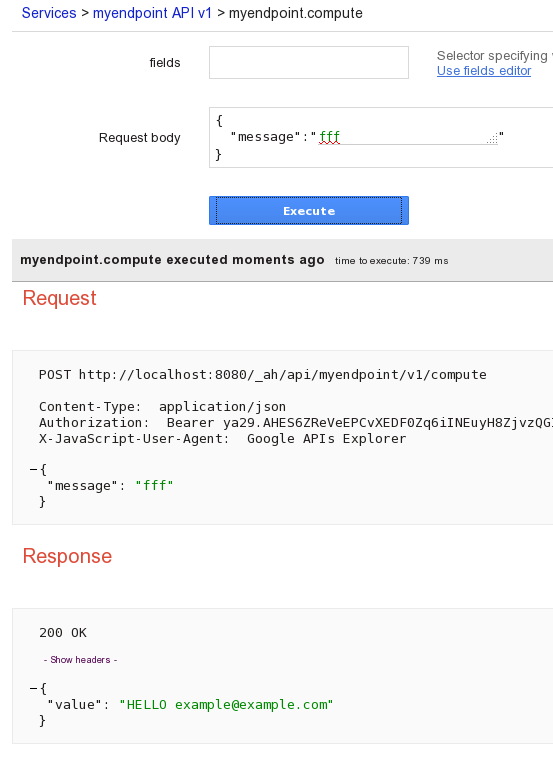
Nevertheless, realize that we now have a fully functioning back-end that is authenticated with OAuth2! And we’re running the back-end locally and accessing it through API explorer. Let’s get our Android app working.
The Android app
Setup the Android emulator
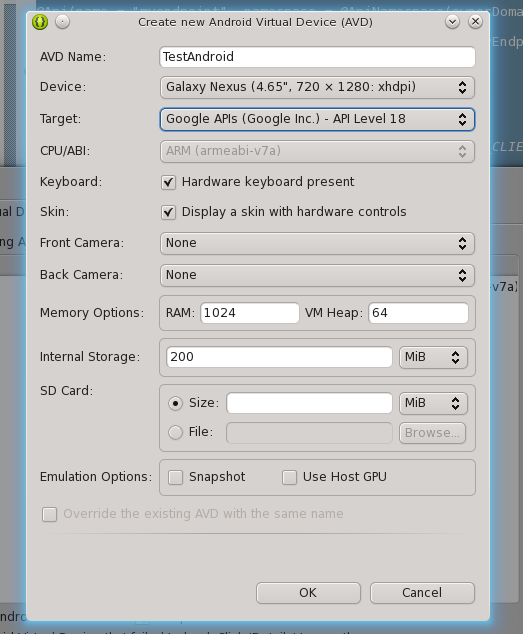
First, we’ll create a virtual Android device on which we’ll run our app. Open virtual device manager by clicking Window > Android Virtual Device Manager. You can choose any name you want. It is important to choose target as Google APIs. If you don’t see such option you need to make sure that you have installed Google APIs and Play services. Re-read this guide and possibly restart ADT. Here are some example settings:
Once the device is created start it by selecting it from the device manager and pressing Start.... It takes a while to start it even on a relatively powerful computer. Usually, the emulator is not fast.
Integrate Google Play project
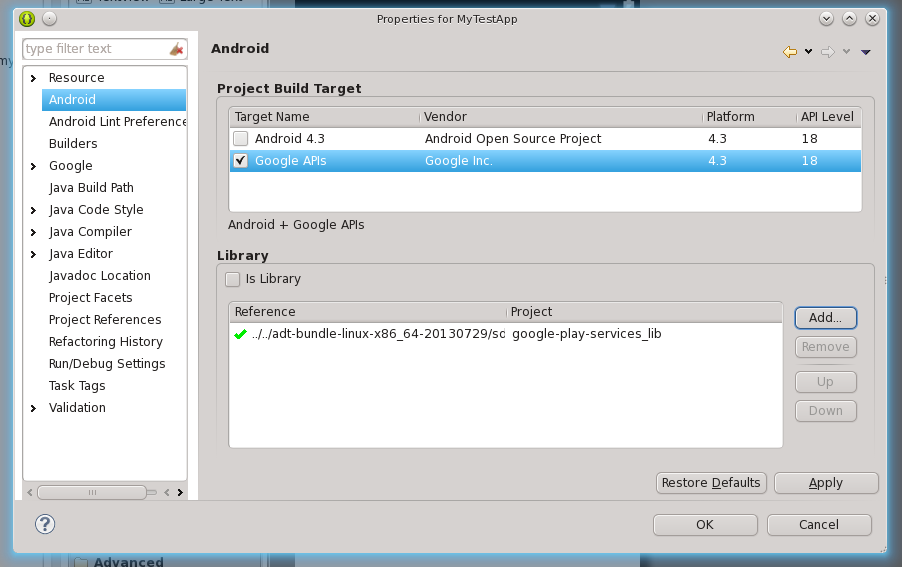
For authentication to work in Android we need to include Google Play project and reference it in our project. To import the project choose File > Import > Android > Existing Android Code Into Workspace > Browse. Navigate to where you keep the unpacked Android SDK, choose sdk\extras\google\google_play_services\libproject\google-play-services_lib, and click OK and Finish. You will now have 3 projects in your workspace, including newly imported google-play-services_lib. You must now include it as a dependency in the Android app project.
Right click the Android app project and choose Properties. Then, navigate to Android. You will need to set the build target as Google APIs and add the google-play-services_lib library:
Delete template code
We will delete some of the template code similarly to what we have done with the back-end. Delete classes GCMIntentService.java and RegisterActivity.java. Then, delete code from MainActivity.java so it looks like this:
package net.pisarenko;

import android.os.Bundle;
import android.app.Activity;

public class MainActivity extends Activity {
    @Override
    protected void onCreate(Bundle savedInstanceState) {
        super.onCreate(savedInstanceState);
        setContentView(R.layout.activity_main);
    }
}
Delete the file activity_register.xml from res/layout folder. At this point we have an app which shows Hello world! when started. Nevertheless, let’s confirm that it’s working by clicking Run > Run As > Android Application. Make sure that the Android project is selected.
Write the app
Let’s make our app work. Our goal is to invoke the endpoint and get back our own e-mail address. For this purpose we’ll add a button. When the button is clicked the app will make a call to the back-end and display the result in a text field. If necessary, the app will ask you to choose a Google account to use.
First, let’s add a button. Double click on res/layout/activity_main.xml. You’ll be presented with the graphical UI editor for the app’s default (and, in our case, only) screen. Drag a button from the left panel somewhere on the screen and save the result:

If you double-click the button you will be shown the underlying XML code for the user interface. You’ll see that the button is given ID button1. We’ll need this to execute a custom action when the button is pressed.
One class that we have not deleted is CloudEndpointUtils.java. Open it and change the field LOCAL_ANDROID_RUN to true. As you have guessed, it means that the app will be using a locally run back-end. While you’re in the file make sure that the port number is correct. I have changed 8888 to 8080 because my back-end is running on port 8080 locally. Although we have deleted template code we will be actually relying on some of it.
Open MainActivity.java and put the following code in:
package net.pisarenko;

import java.io.IOException;

import com.google.api.client.extensions.android.http.AndroidHttp;
import com.google.api.client.googleapis.extensions.android.gms.auth.GoogleAccountCredential;
import com.google.api.client.json.jackson.JacksonFactory;

import net.pisarenko.myendpoint.Myendpoint;
import net.pisarenko.myendpoint.model.MyRequest;
import net.pisarenko.myendpoint.model.MyResult;
import android.os.AsyncTask;
import android.os.Bundle;
import android.view.View;
import android.widget.Button;
import android.view.View.OnClickListener;
import android.widget.TextView;
import android.accounts.AccountManager;
import android.app.Activity;
import android.content.Intent;

public class MainActivity extends Activity {
    private Myendpoint endpoint;
    private GoogleAccountCredential credential;

    static final int REQUEST_ACCOUNT_PICKER = 2;
    static final String WEB_CLIENT_ID = "607077117986.apps.googleusercontent.com";

    @Override
    protected void onCreate(Bundle savedInstanceState) {
        super.onCreate(savedInstanceState);
        setContentView(R.layout.activity_main);

        credential = GoogleAccountCredential.usingAudience(this,
                "server:client_id:" + WEB_CLIENT_ID);

        chooseAccount();

        Myendpoint.Builder endpointBuilder = new Myendpoint.Builder(
            AndroidHttp.newCompatibleTransport(),
            new JacksonFactory(),
            credential);
        endpoint = CloudEndpointUtils.updateBuilder(endpointBuilder).build();

        Button button = (Button) findViewById(R.id.button1);

        button.setOnClickListener(new OnClickListener() {
            public void onClick(View v) {
                new DoSomethingAsync(this, endpoint).execute();
            }
        });
    }

    @Override
    protected void onActivityResult(int requestCode, int resultCode, Intent data) {
        super.onActivityResult(requestCode, resultCode, data);
        switch (requestCode) {
        case REQUEST_ACCOUNT_PICKER:
            if (data != null && data.getExtras() != null) {
                String accountName = data.getExtras().getString(
                        AccountManager.KEY_ACCOUNT_NAME);
                if (accountName != null) {
                    credential.setSelectedAccountName(accountName);
                    // User is authorized.
                }
            }
            break;
        }
    }

    private void chooseAccount() {
        startActivityForResult(credential.newChooseAccountIntent(),
                REQUEST_ACCOUNT_PICKER);
    }

    private class DoSomethingAsync extends AsyncTask<Void, Void, MyResult> {
        private Myendpoint endpoint;

        public DoSomethingAsync(OnClickListener onClickListener,
                Myendpoint endpoint) {
            this.endpoint = endpoint;
        }

        @Override
        protected MyResult doInBackground(Void... params) {
            try {
                MyRequest r = new MyRequest();
                r.setMessage("Tesla");
                return endpoint.compute(r).execute();
            } catch (IOException e) {
                e.printStackTrace();
                MyResult r = new MyResult();
                r.setValue("EXCEPTION");
                return r;
            }
        }

        @Override
        protected void onPostExecute(MyResult r) {
            TextView t = (TextView) findViewById(R.id.textView1);
            t.setText(r.getValue());
        }
    }
}
OK, there are quite some things going on. We include the web client ID as static field (WEB_CLIENT_ID). Note that it’s the same value we got from the cloud console.
The onCreate method is called for every Android screen. We do several things. First, we create a GoogleAccountCredential object and we call the Android account picker. Our app will always call the account picker. A better behavior would only do it once but it’s fine for our purposes. Then, we create an object that represents the API of our back-end. Finally, we set a callback on the button’s click. We must use an asynchronous task as doing anything complex in the main (UI) thread is highly discouraged in Android.
The DoSomethingAsync task does the actual invocation of the back-end endpoint. I suggest to read Android docs to better understand life-cycles of objects and standard ways of doing things.
That’s it! Now, run the app. You’ll be presented with an account picker first. Either enter existing account details or create a new one (for tests). Then, click that button and get that authenticated response from the back-end!
Congratulations!
Congrats! You now have the whole development stack running on your machine. You can continue experimenting by adding new endpoints to your back-end and building the Android app. As a next step try deploying your code to AppEngine and make the Android emulator talk to it instead!
P.S. I have deleted all mentioned projects and IDs from the console after finishing this tutorial.