About 3 months ago I had nothing better to do so I decided to replace an off-the-shelf Linksys E4200 wireless router with a custom build running an unrestricted O/S. I admit E4200 worked reliably through the years on stock firmware but I never felt comfortable with the privacy and network vulnerability aspects of commonly sold devices. And I find third-party router firmwares too complicated to fully comprehend and tweak. There’s simply too much configuration becauase it needs to satisfy many use cases.
I’ve never documented that assembly and installation experience so when a new opportunity to build a 802.11ac access point using very similar hardware came about I jumped right at it.
In general, there’s nothing particularly novel about buying standard x86 hardware, putting together a couple of components and then installing Linux on it. But with wireless networking, especially 802.11n and 802.11ac, there’s numerous configuration options available. Without tuning and verification a 802.11ac/802.11n setup might run as fast as 802.11g which isn’t any fast at all. After going through these builds I’m hesitant to take wireless configuration for granted, especially when just buying SOHO grade equipment.
The “why”
Why do a DIY router build? There’s the privacy and vulnerability aspects that I had already mentioned. Large manufacturers discontinue updating their SOHO devices within years of release. In light of critical vulnerabilities found just in core Linux libraries it is not an assuring situation.
But the real reason that pushed me to change are the unnecessary features and small things that can’t be configured on most SOHO routers. For example, there are often built-in DNS servers but most of the devices I’ve used don’t let the user to set the default search domain. Instead, these routers push the search domain from ISP. It’s a minor detail but there are plenty such annoyances.
The unneeded features just scream additional attack vectors to me. I prefer to have a list of iptables rules that fits on a screen because I’m not running an ISP or a data-center at home. I can isolate untrusted devices and let them connect to the Internet only without having any access to other hosts in the network.
Bits and parts
I have built the router based on PC Engines APU x86 board. It has a relatively powerful CPU, PCI express bus, mSATA, SIM slot, USB, serial port and other extras. I like the passive cooling and low power consumption. I would not want a router based on old PC desktop hardware because that takes up a lot of space, burns lots of power and makes noise.

Total cost of parts for dual-radio 802.11n router came at around 200$. The price for the new 802.11ac access point is higher at around 260$. That’s because the 802.11ac radio. In total, the materials don’t cost significantly more than off-the-shelf stuff.
Since I’m living in Switzerland and PC Engines is a Swiss company I had one more reason to order from them. I’m impressed with the shipping speed and invoice-based payment.
The list of parts for the 802.11ac build:
- SSD M-Sata 16GB MLC Phison
- APU.1D system board 2GB
- Enclosure 3 LAN, black
- AC adapter 12V 2A
- 3x Antenna reverse SMA dual band
- 3x Cable MMCX -> reverse SMA
- SATA data + power cable (for a hack, read further)
- Mini PCI Express Extender Extension FFC Cable
- COMPEX WLE900V5-23 miniPCIe module, AR9880, 802.11ac, 3*3MIMO
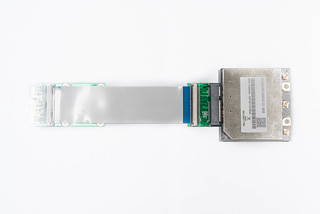
Unlike with the 802.11n router build I had to do a couple of simple hacks to put it all together. The Compex 802.11ac radio is wide so it does not fit in a standard miniPCIe slot. I had to order an extension cable from eBay and use double-sided adhesive tape to put the radio on the inside “ceiling” of the enclosure. Then, I had to drill a hole in the enclosure to put an additional 3rd antenna for achieving 3*3MIMO. Finally, Compex radio requires external 5V supply. Luckily, the board has pins for powering a SATA drive. I’ve cut a SATA data+power cable and used the power connector to connect 5V positive to the radio.
You can see the semi-assembled board on the photo:

Connecting, O/S install
PC Engines APU board comes without a graphics adapter. I/O happens through serial port. I had to buy a USB adapter (that occasionally BSODs Windows 8) and guess what the correct settings are (parity, speed, etc). Furthermore, the settings could change through the boot process as the running software can change the configuration.
PC Engines provides a utility to create a bootable USB drive for updating the firmware. It works really well and requires no fiddling whatsover. The APU board serial rate is set to 115200 with the rest of values as default.
It’s possible to use SD card, USB flash drive, mSATA or SATA for storage. I opted in for mSATA because SSDs are not that expensive anymore (especially the small 16GB kind), much faster than flash and more reliable.
I considered using MikroTik and other AP/router distributions. I could not get MikroTik to respond on serial no matter what settings I tried. I’m glad it never worked because MikroTik is unnecessarily complex for my needs. It’s an anti-thesis of the simplicity I’m striving for.
My Linux distribution of choice is Gentoo. To install Gentoo I used a bootable Linux USB drive. Almost any live USB distribution works as long as it has basic command line tools. I did as little as I could on serial and enabled SSH as soon as possible. To enable serial it’s important to add console=ttyS0,115200n8 to the kernel boot arguments. That also applies for booting live distributions.
Since the router I had worked on is so similarly specced to the new access point build I made a shortcut in the install process. Instead of installing from scratch I copied an image of the existing disk. I’ve then logged-in into the access point and changed settings.
The rest of the installation steps are left as an exercise to the reader. Joking aside, the official Gentoo installation documentation is sufficiently sharp to get a running system. I have included important configuration files at the end of the article.
Software setup, hostapd and 802.11ac specifics
Once the system boots we get to the interesting part of making the access point part of our access point build working. And there are a couple of important details.
Channels
Radio channels were relatively simple to comprehend in the days of 802.11b/g 2.4Ghz spectrum. There are 11 20Mhz channels, of which 3 non-overlapping. The setup consist of choosing the channel which has least interference and least amount of users.
In 5Ghz spectrum things become more complicated. The channels vary in width: from 20 Mhz all the way up to 160 Mhz. There are several frequency ranges and these ranges are regulated. Regulations differ from country to country. It’s not possible to choose just any channel. It is necessary to check which channels are allowed, which channels is the radio capable of and then decide based on busyness of the ether.
To check which channels are allowed by the regulations run iw reg get:
ap ~ # iw reg get
country CH: DFS-UNSET
        (2402 - 2482 @ 40), (N/A, 20), (N/A)
        (5170 - 5250 @ 80), (N/A, 20), (N/A)
        (5250 - 5330 @ 80), (N/A, 20), (0 ms), DFS
        (5490 - 5710 @ 160), (N/A, 27), (0 ms), DFS
        (57000 - 66000 @ 2160), (N/A, 40), (N/A)
The output shows the regulation for Switzerland (CH) because I have previously set the country using iw reg set command:
ap ~ # iw reg set CHBy the way, unless you change the domain to the country where you reside the radio will be restricted by the set of all countries. In reality this means that almost all channels will be out of bounds. I set the domain in a startup script.
DFS is a technology that allows wireless to work on frequencies shared with weather radars and other systems on the same frequency bands. DFS makes the radio listen for pulses from those systems to prevent interference.
The channels supported by radio can be listed using iw list:
ap ~ # iw list
...
                        * 5180 MHz [36] (17.0 dBm)
                        * 5200 MHz [40] (17.0 dBm)
                        * 5220 MHz [44] (17.0 dBm)
                        * 5240 MHz [48] (17.0 dBm)
                        * 5260 MHz [52] (20.0 dBm) (no IR, radar detection)
                          DFS state: usable (for 440 sec)
                          DFS CAC time: 60000 ms
                        * 5280 MHz [56] (20.0 dBm) (no IR, radar detection)
                          DFS state: usable (for 440 sec)
                          DFS CAC time: 60000 ms
                        * 5300 MHz [60] (20.0 dBm) (no IR, radar detection)
                          DFS state: usable (for 440 sec)
                          DFS CAC time: 60000 ms
                        * 5320 MHz [64] (20.0 dBm) (no IR, radar detection)
                          DFS state: usable (for 440 sec)
                          DFS CAC time: 60000 ms
                        * 5500 MHz [100] (disabled)
...
                        * 5825 MHz [165] (disabled)
...
Radio firmware
I’m using Compex WLE900V5-23 radio that is based on Atheros AR9880 2.0 chipset. The support is available in kernel with ath10k module. However, the required firmware is not shipped with linux-firmware package yet so it’s required to manually download the firmware and put it into the kernel source tree.
I’ve obtained the firmware from ath10k git repository. I’ve then placed the ath10k directory in firmware directory in the kernel source tree. Finally, I’ve changed the following kernel settings to build the firmware into the kernel:
CONFIG_FIRMWARE_IN_KERNEL=y
CONFIG_EXTRA_FIRMWARE="ath10k/QCA988X/hw2.0/firmware-2.bin ath10k/QCA988X/hw2.0/board.bin"
CONFIG_EXTRA_FIRMWARE_DIR="firmware"
Network setup and hostapd
I’ve configured the new access point to work as a bridge. It does not do any routing. The access point makes the wired connection available to wireless clients.
I’m using OpenRC. Configuration in /etc/conf.d/net is very simple. There is a bridge configuration linked to the wired interface:
ap linux # cat /etc/conf.d/net

dns_domain_lo="bethania"
dns_search="bethania"

# AP bridge setup
config_enp1s0="null"
bridge_br0="enp1s0"
rc_net_br0="net.enp1s0"
config_br0="192.168.69.2/24"
routes_br0="default via 192.168.69.1"
dns_servers_br0="192.168.69.1"
Configuration of the hostapd init script:
ap linux # cat /etc/conf.d/hostapd

INTERFACES="br0"
CONFIGS="/etc/hostapd/hostapd.conf"
OPTIONS=""
hostapd configuration describes capabilities of the radio and sets up the frequencies, security and useful features. For example, to use wireless on DFS controlled frequencies it is required to enable ieee80211d and ieee80211h settings. Here’s a working and tested 802.11ac setup that I’m using right now:
ap linux # cat /etc/hostapd/hostapd.conf

### hostapd configuration file
ctrl_interface=/var/run/hostapd
ctrl_interface_group=0
interface=wlp4s0
driver=nl80211
bridge=br0

### IEEE 802.11
ssid=bethaniaven9
hw_mode=a
channel=52
max_num_sta=128
auth_algs=1

### DFS
country_code=CH
ieee80211d=1
ieee80211h=1

### IEEE 802.11n
ieee80211n=1
ht_capab=[HT40+][LDPC][SHORT-GI-20][SHORT-GI-40][TX-STBC][RX-STBC1][DSSS_CCK-40]

### IEEE 802.11ac
ieee80211ac=1
vht_oper_chwidth=1
vht_capab=[MAX-MPDU-11454][RXLDPC][SHORT-GI-80][TX-STBC-2BY1][RX-STBC-1]
vht_oper_centr_freq_seg0_idx=62

### IEEE 802.11i
wpa=2
wpa_key_mgmt=WPA-PSK
wpa_passphrase=XXX
rsn_pairwise=CCMP

### hostapd event logger
logger_syslog=-1
logger_syslog_level=2
logger_stdout=-1
logger_stdout_level=2

### WMM
wmm_enabled=1
uapsd_advertisement_enabled=1
wmm_ac_bk_cwmin=4
wmm_ac_bk_cwmax=10
wmm_ac_bk_aifs=7
wmm_ac_bk_txop_limit=0
wmm_ac_bk_acm=0
wmm_ac_be_aifs=3
wmm_ac_be_cwmin=4
wmm_ac_be_cwmax=10
wmm_ac_be_txop_limit=0
wmm_ac_be_acm=0
wmm_ac_vi_aifs=2
wmm_ac_vi_cwmin=3
wmm_ac_vi_cwmax=4
wmm_ac_vi_txop_limit=94
wmm_ac_vi_acm=0
wmm_ac_vo_aifs=2
wmm_ac_vo_cwmin=2
wmm_ac_vo_cwmax=3
wmm_ac_vo_txop_limit=47
wmm_ac_vo_acm=0

### TX queue parameters
tx_queue_data3_aifs=7
tx_queue_data3_cwmin=15
tx_queue_data3_cwmax=1023
tx_queue_data3_burst=0
tx_queue_data2_aifs=3
tx_queue_data2_cwmin=15
tx_queue_data2_cwmax=63
tx_queue_data2_burst=0
tx_queue_data1_aifs=1
tx_queue_data1_cwmin=7
tx_queue_data1_cwmax=15
tx_queue_data1_burst=3.0
tx_queue_data0_aifs=1
tx_queue_data0_cwmin=3
tx_queue_data0_cwmax=7
tx_queue_data0_burst=1.5
Final words and config files
Once hostapd is running it’s important to measure transfer rates. The first time I ran hostapd I was getting 802.11b speed. After a day of experimenting and reading through mailing list discussions I arrived at a configuration that yields 60 MB/s (480Mbit) real world samba transfer speed! I’m genuinely impressed as it’s more than 2X faster than the existing 802.11n setup that I currently have.
List of configuration files that you might find useful:
The fully assembled access point in flesh:
